This tutorial explains the initial steps to start using MyBasicCRM. These initial steps include:
1) Adding your first contact, creating custom contact types
2) Adding custom fields for your types of contacts
3) Importing contacts to your account
4) Adding users to your account and editing permission rights
5) Creating and adding custom activities/tasks for your contacts
CREATING YOUR FIRST CONTACT AND CONTACT TYPES
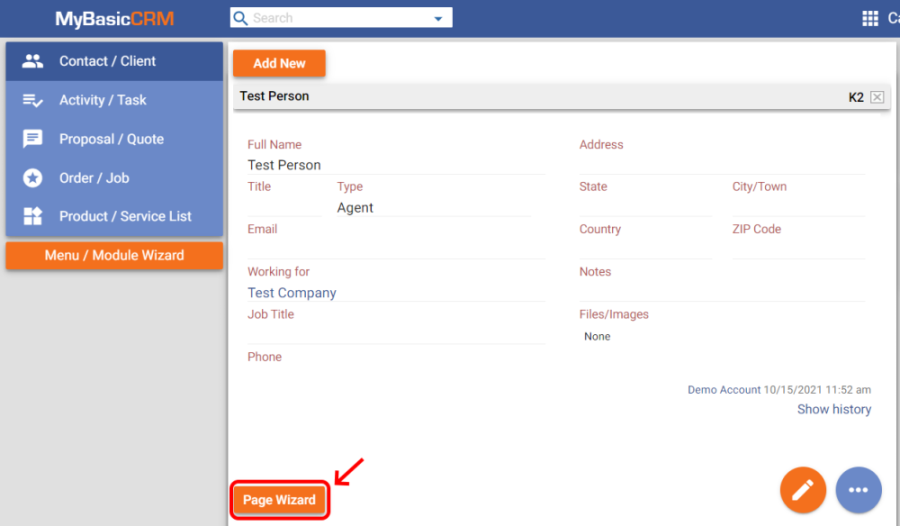
Go to the 'Contact/Client' menu item and click 'Add New' to add your first contact.
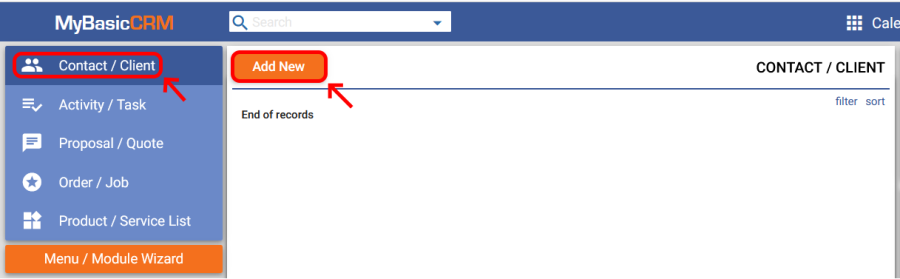
MBC organizes your contacts/clients so that they are all linked to organizations (or companies). You can add a contact as a person or company. You can customize Person and Company pages, as you will see in the following slides.
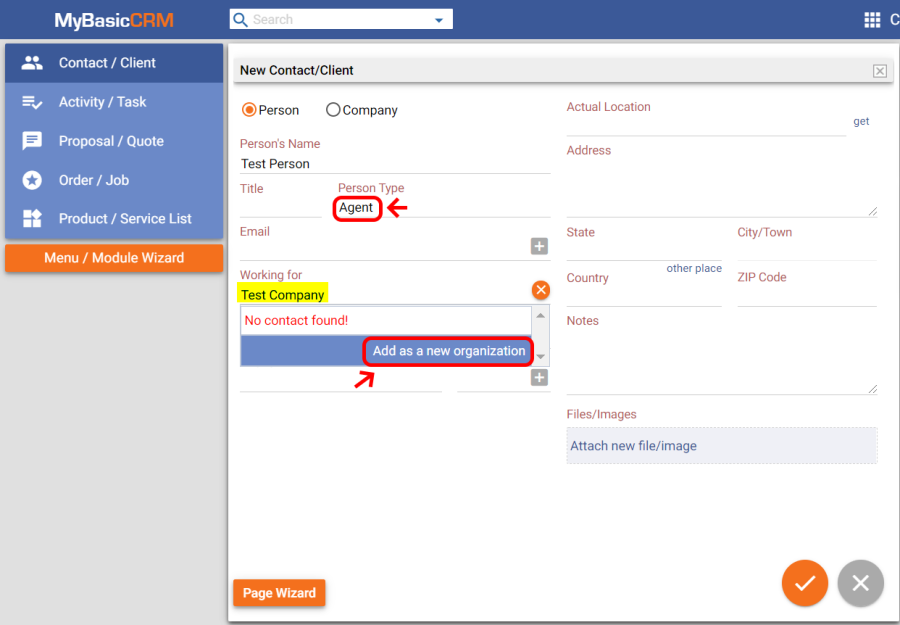
Let's add our first contact by selecting the 'Person' option and adding a name. It is enough information to save our first contact, but let's go further and add a new type. Click on the 'Person type' field and then click the 'Add/Delete Type' button. Add a new type of person, such as 'Agent', and save your new type.

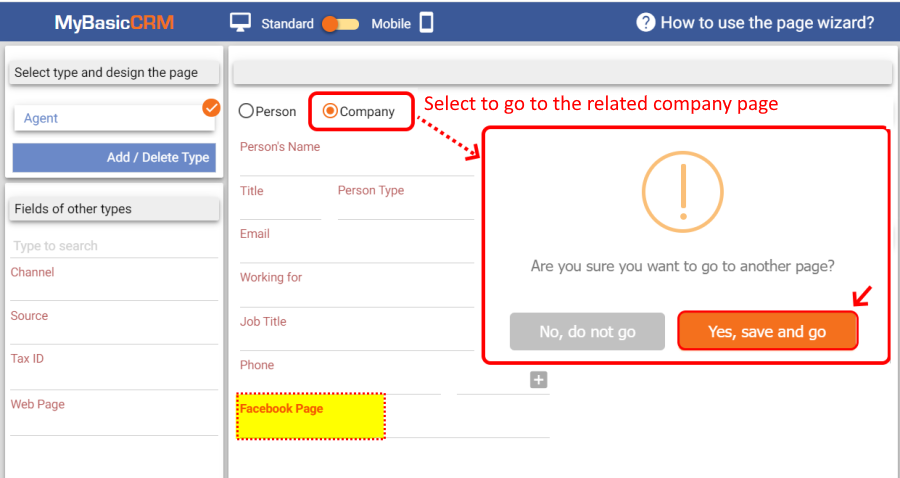
Now you can select your contact as an 'Agent'. Let's link Test Person to an organization. Click on the 'Working for' field and write the organization's name, such as 'Test Company'. It is a search field, and you can select from a list of companies depending on your search. Since we don't have any organizations yet, nothing will appear in the search results. Click the 'Add as a new organization' button to save it as a new company.
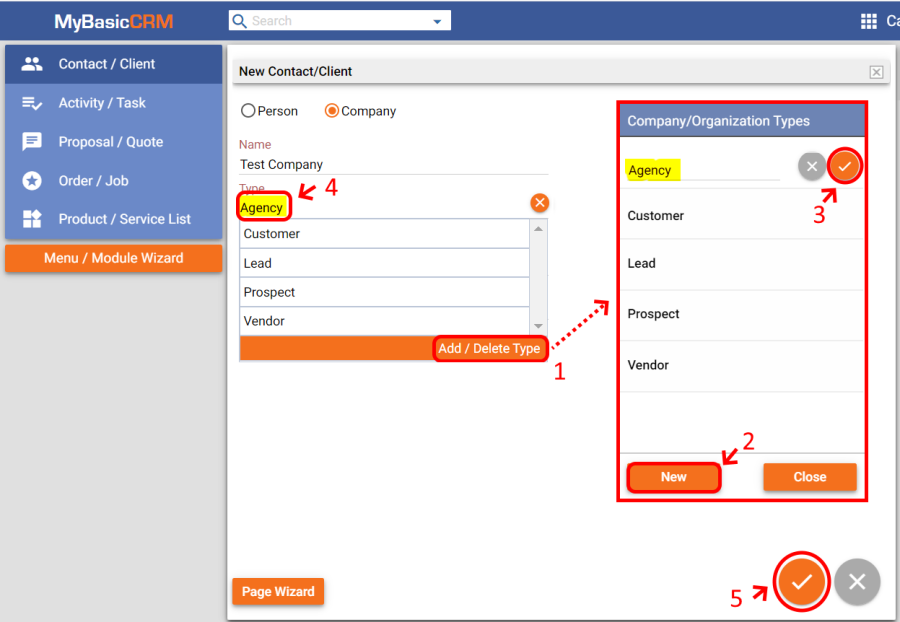
You will be diverted to a new company page. On this page, similarly, you can add a new organization type. Add a new type of person, such as 'Agency', and save it. Now you can select the Test Company as an 'Agency' , add more details if you like and save your contact. You will go back to the contact page of Test Contact; you can save your first contact now.
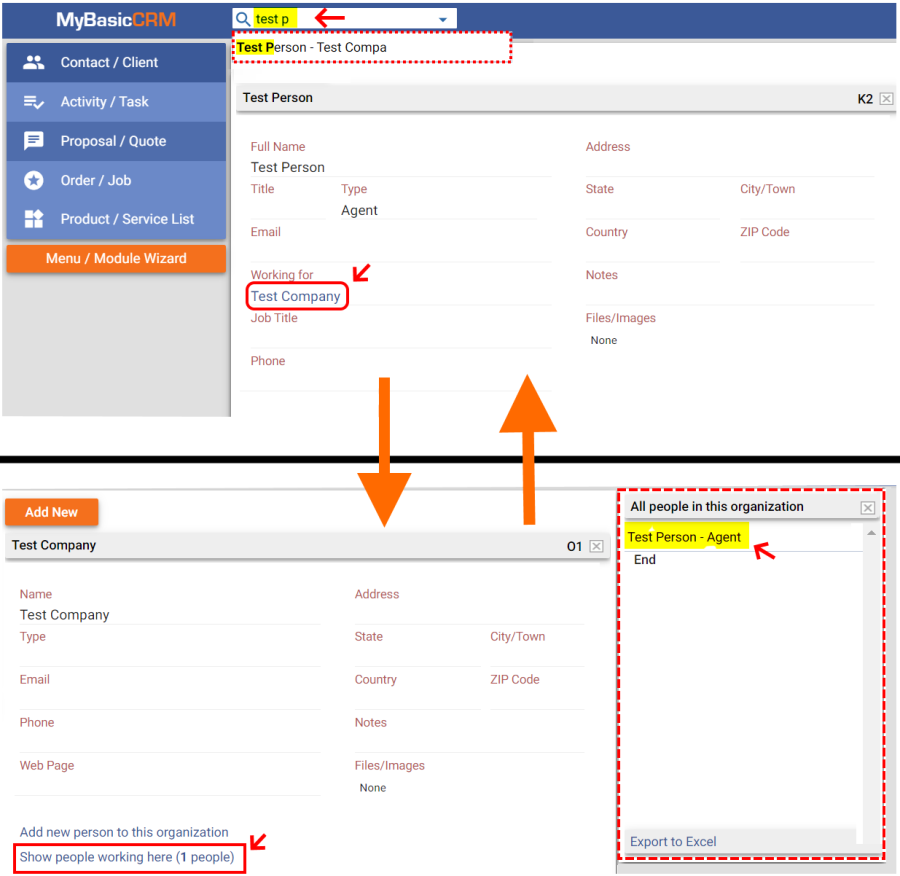
One easy way to go to your contact page is using the search bar. You can also switch between person and company pages because they are all linked to each other.
Let's customize and add a custom field to our contact pages in the following slide.
ADDING CUSTOM FIELDS
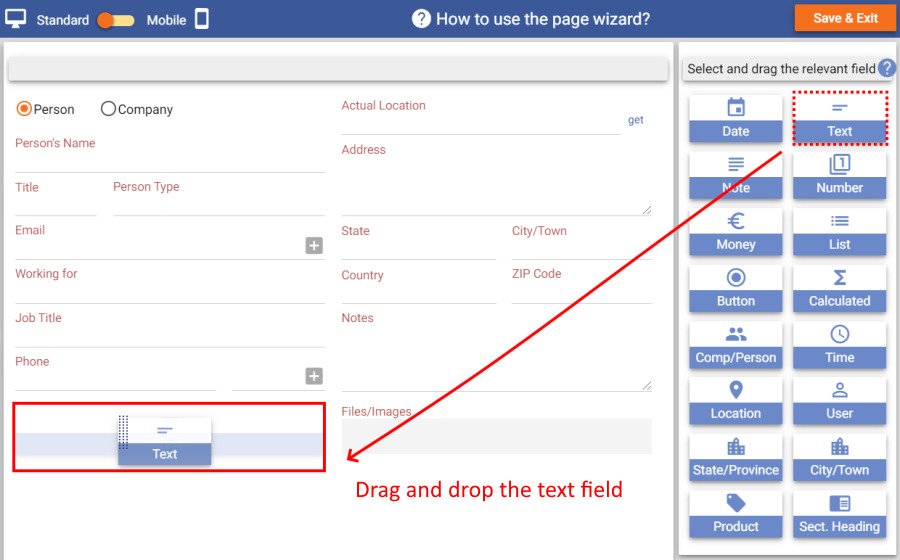
Go to the contact page of Test Person (or any other contact page) and click on the 'Page Wizard' button. With the help of Page Wizard, you can customize any pages (contact, activity, order etc.) in terms of their look, custom fields or field behaviours. Since we are on a contact page now, we will edit the contact page details.
First, you need to select the type of contact you want to customize. Let's select the 'Agent' type that we have just added. You can switch between types on this menu if necessary.

On the right side of the screen, you will see custom field types that you can add to your page. Suppose that we need a text field to save the Facebook pages of our contacts. Drag and drop a 'Text' type of field to anywhere on the page. You can also change the page's look by dragging and placing the fields to other parts of the page.
The next step is to edit the properties of the custom field. First, name your field, such as 'Facebook page' and click next. You can edit your users' access to this field on the next screen. Since you are the only user at the moment, we can skip this step.
>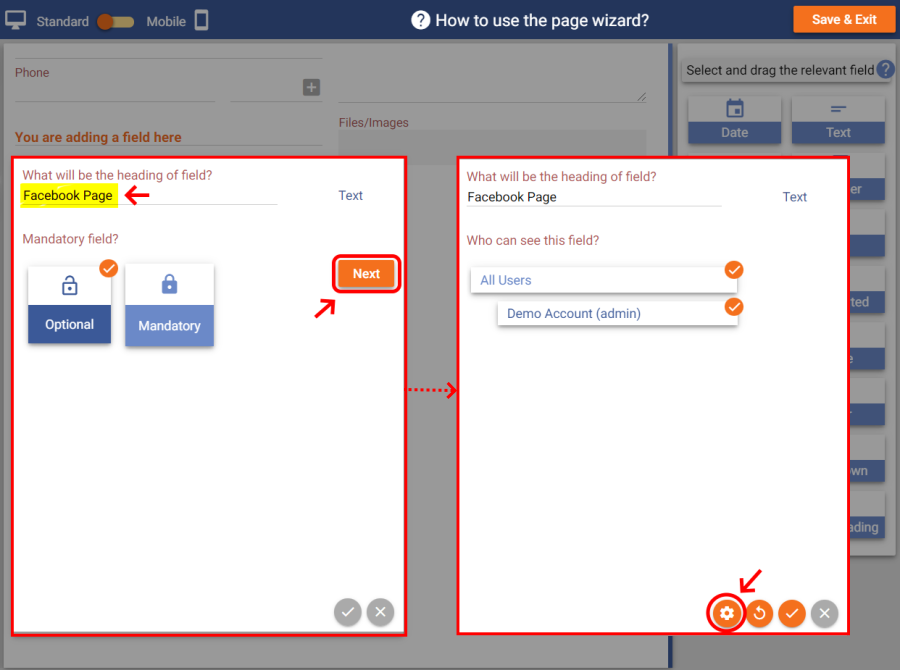
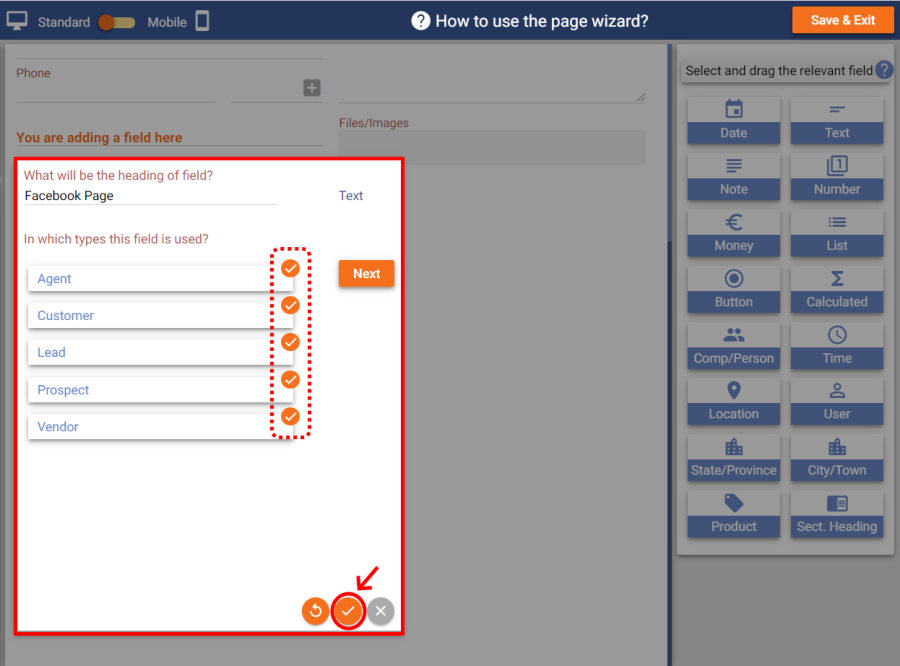
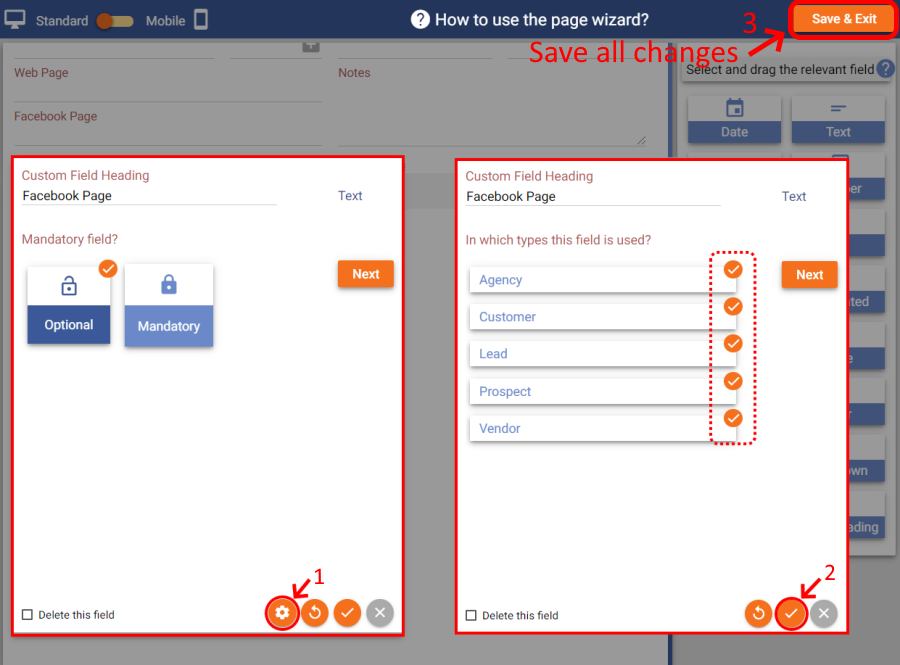
Click to the settings icon and select the type of contacts that the 'Facebook page' custom field you want to be visible. Let's select all and save. For the sake of this tutorial, saving at this point is enough, although you can customize a lot more features.
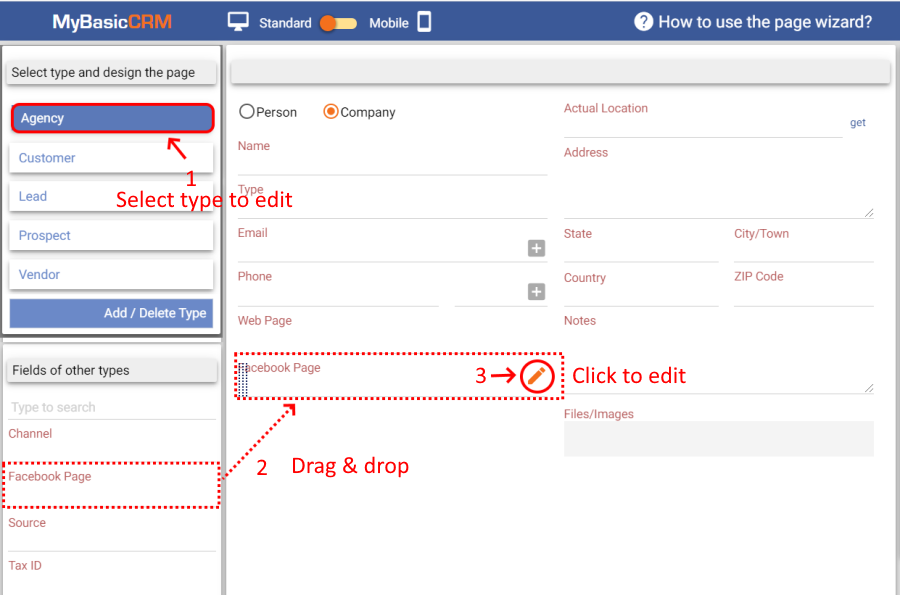
You will see that the 'Facebook page' custom field is already placed on the contact page for persons. Now, you may want to edit the contact page of the companies/organizations. To do that, select the 'Company' item above, and then click 'Yes, save and go'.
Select the type of contact you want to customize. Let's select the 'Agency' type that we have just added. You will see the custom fields you have already added for persons but not yet activated for companies on the left side of the screen. Drag and drop the 'Facebook page' custom field to enable it also for the company pages. Then click the edit button to edit the custom field properties.
Click on the settings icon and select the type of contacts that the 'Facebook page' custom field you want to be visible. Let's select all types and save. Click 'Save & Exit' to save all changes and go back to the contact page.
We have already set the types of contacts and custom fields we need. It is time to import more contacts using excel spreadsheets.
IMPORTING YOUR CONTACTS
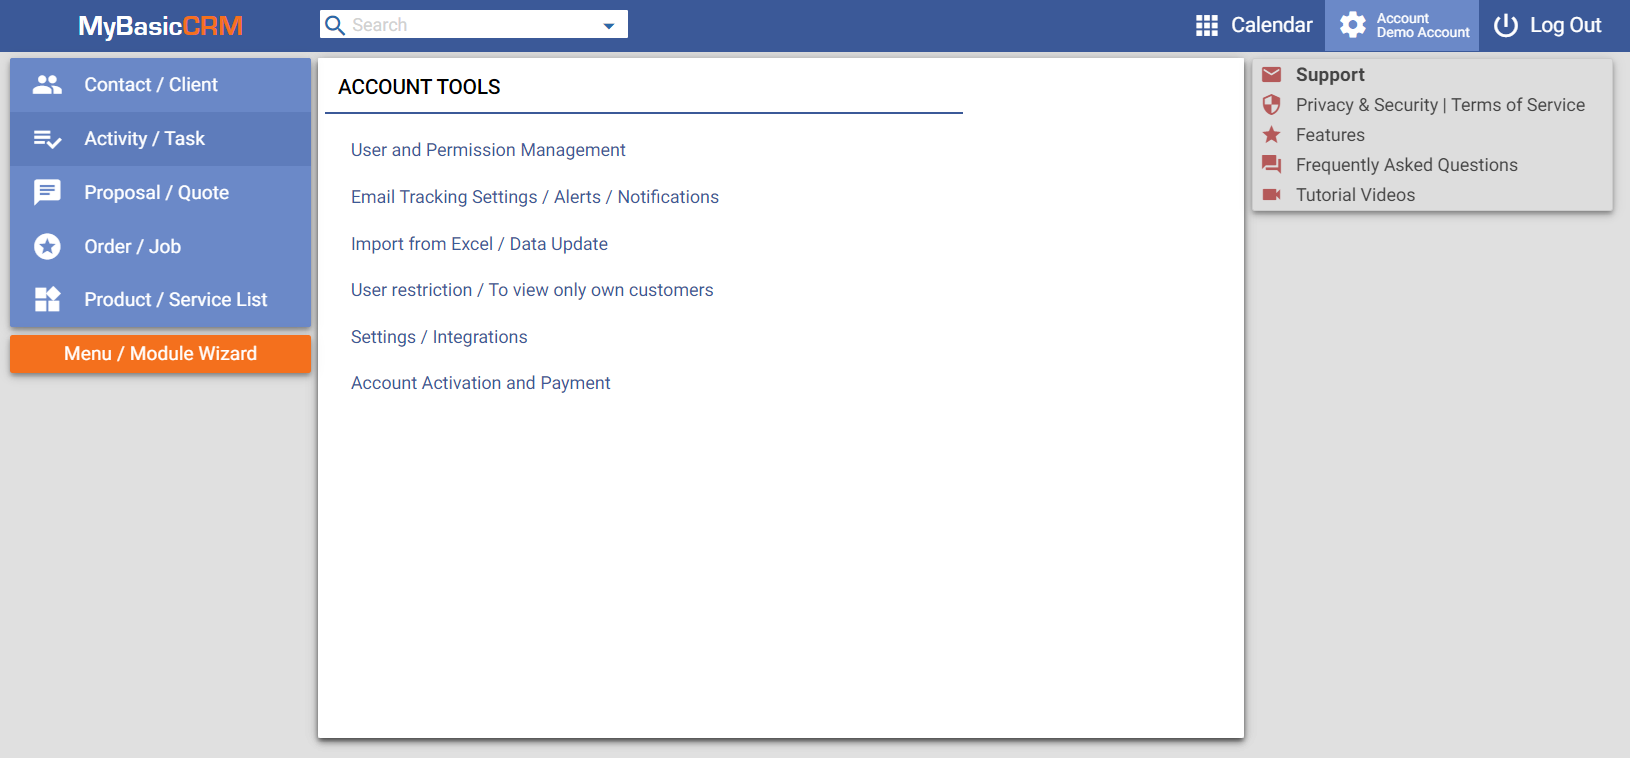
You need to use an excel template to import your data to MyBasicCRM. First, go to Account Settings and click on the 'Import from Excel / Data Update' link.
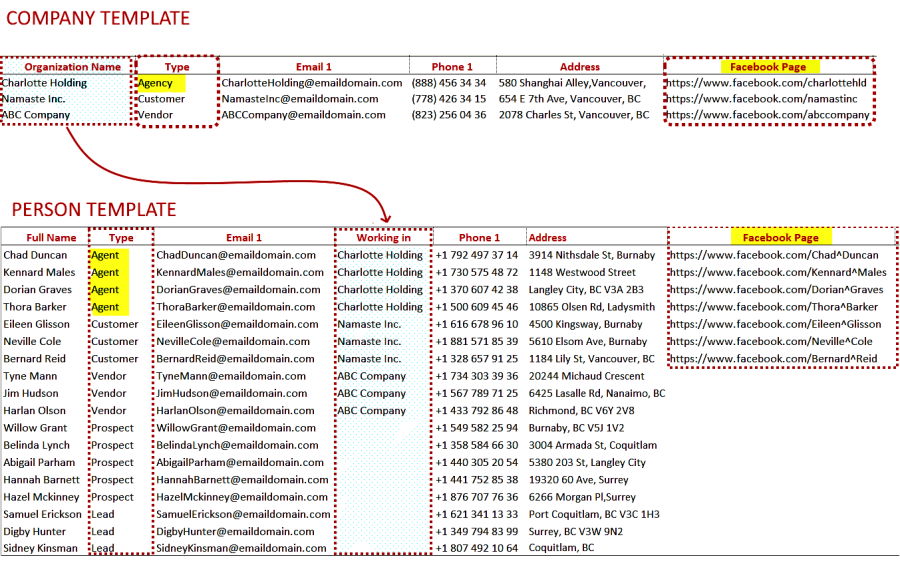
Click on the 'Import Organization' and 'Import Person' icons separately, and download the relevant templates by clicking on the 'Open Excel template' links.
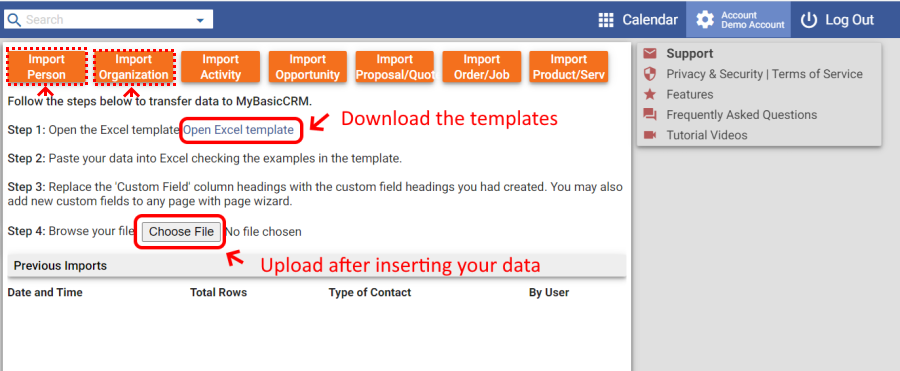
Insert your data by following the instructions on top of the templates. You can also add data to your custom fields, such as the 'Facebook page' field that we have just created. Pay attention to using the same company names that you used for organizations.
Save and upload your templates. Click on 'see imported data', and new records will appear on the right. You can also delete the import by clicking on the 'del' link just next to it.
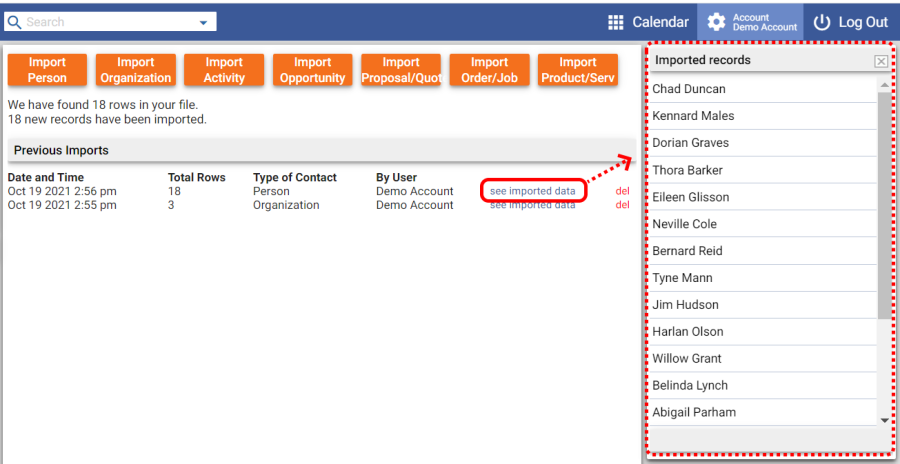
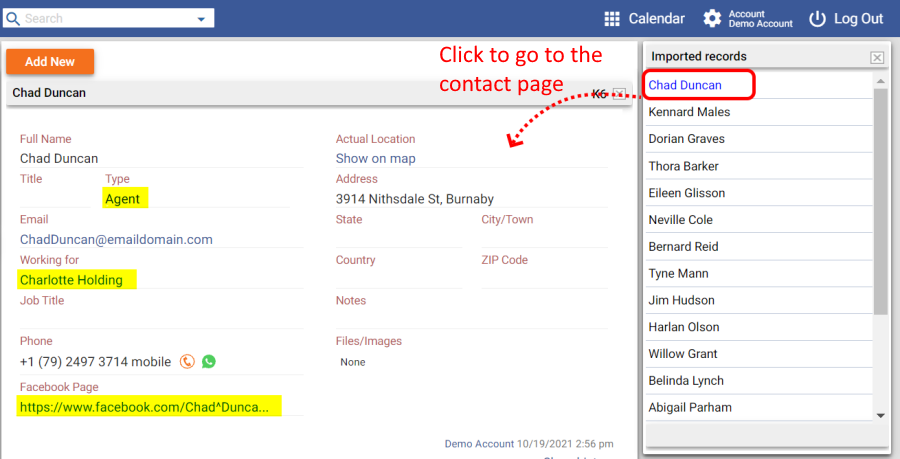
Click on any of the new records and check if the fields are correctly imported.
You can refer to related tutorials for importing data for more information. Please get in touch with us through support@mybasiccrm.com if you need help to import your data to MyBasicCRM or if you need to migrate your database from another platform.
We have our contacts imported into the system, and now it is time to add more users to MyBasicCRM.
ADDING USERS TO YOUR ACCOUNT
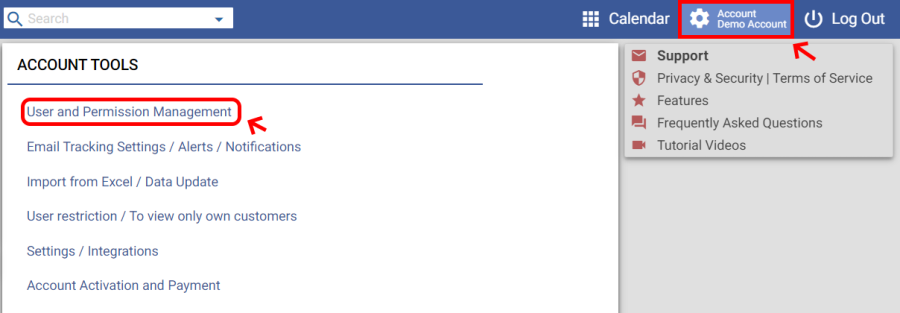
Go to Account Setting and click on the 'User and Permission Management'.
You can add as many users as you'd like by just entering their names and email addresses. You can also create departments and add users to these departments.
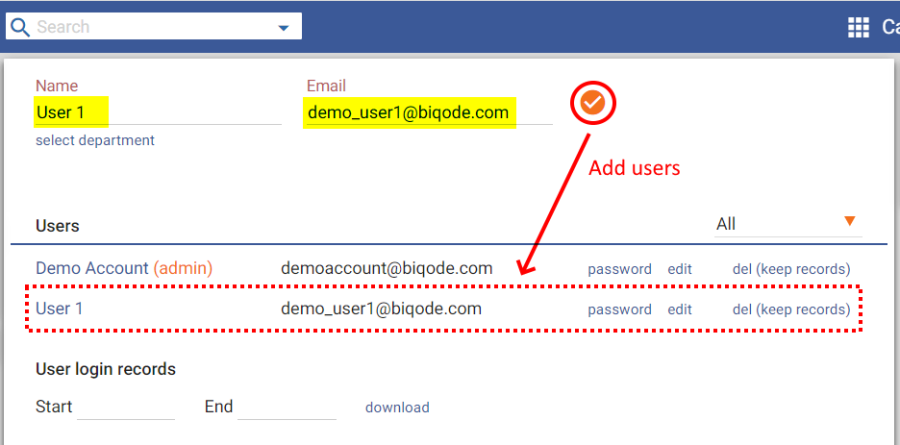
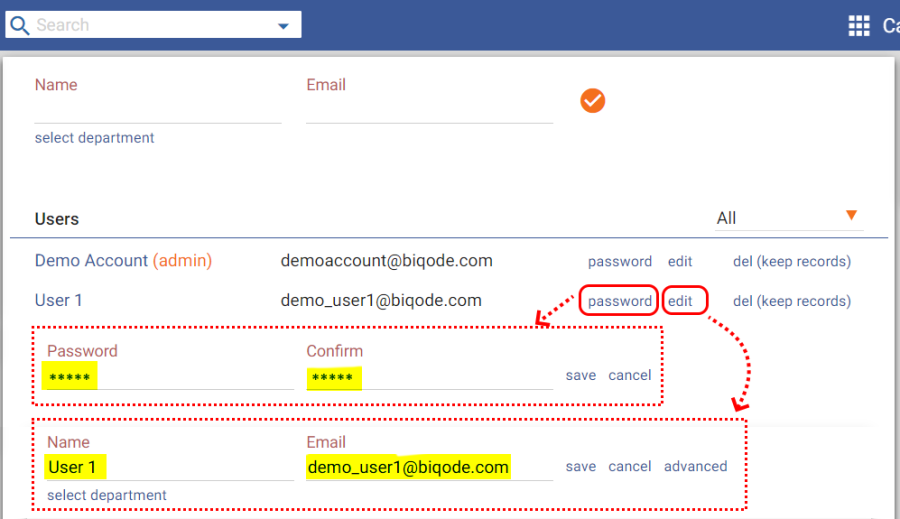
The new user will receive an email to set a password. You can also set passwords for the users. Use the 'password' and 'edit' buttons next to each user record to change the users' name, email, and password.
Click on the user name to edit permissions. You can quickly give 'admin permissons' or 'all permissions except admin' to the user by enabling relevant options. You can also set explicit permissions for each user or department.
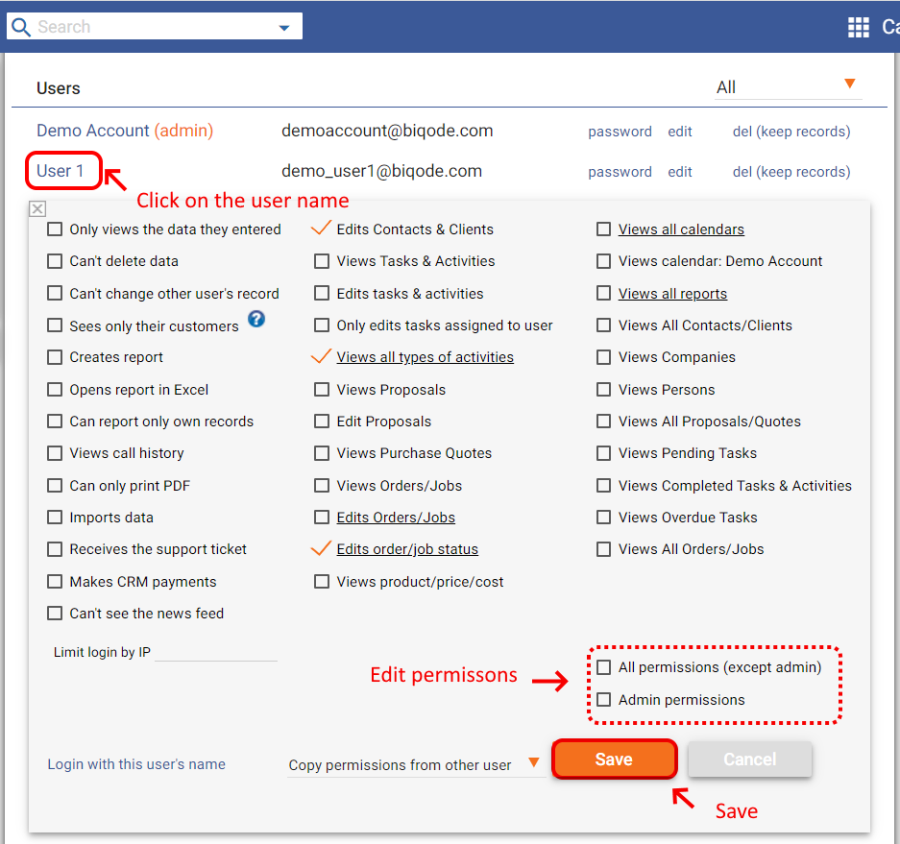
You can also easily restrict the access of your client reps, resellers or branches. Please refer to related tutorials for more information. You can also reach us through support@mybasiccrm.com if you need help with your user permissions.
Next, let's add custom activities/ tasks for our contacts and assign them to specific users.
CREATING CUSTOM ACTIVITIES/TASKS
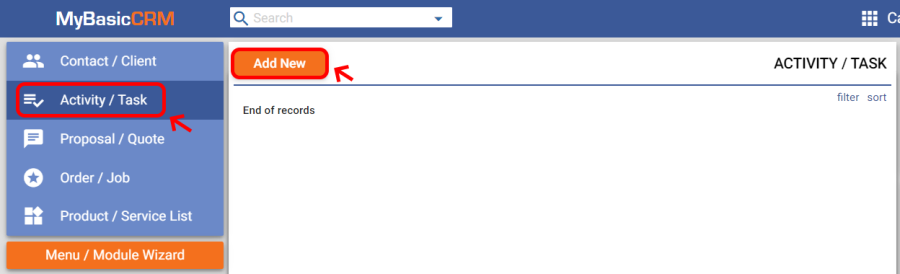
Go to the 'Activity/Task' menu item and click on the 'Add New' button.
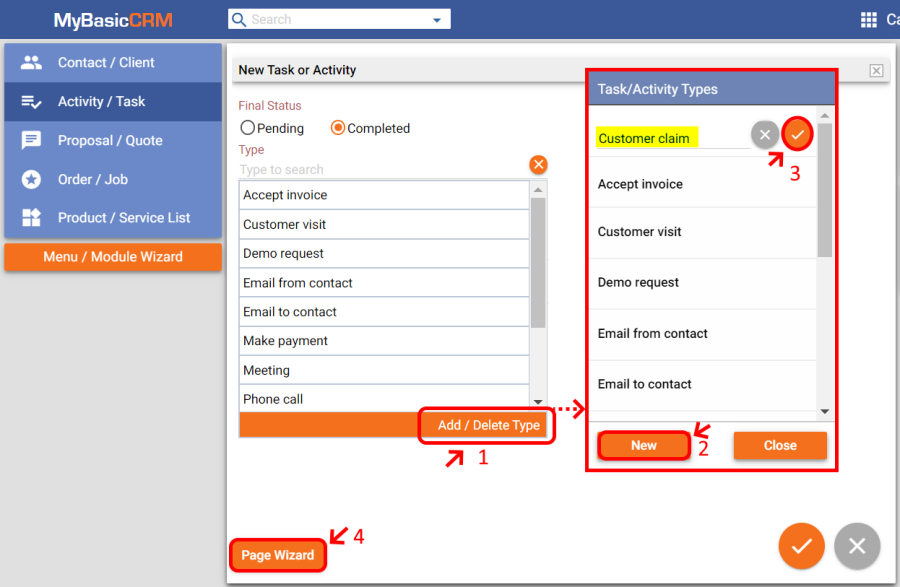
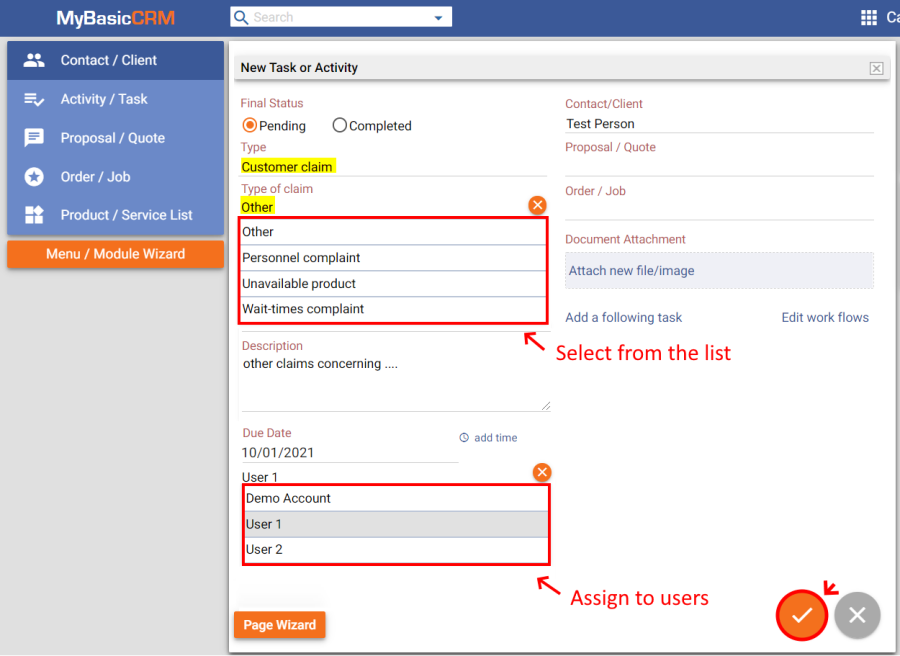
To add a custom type of task/activity, first, click on the 'Type' field and then 'Add/Delete Type' button. Click 'New' to add a new type, such as 'Customer claim', and save. Now, it is possible to select the 'Custom claim' type of activity from the list. Let's go further and customize the page for this new type. To do that, click on the 'Page Wizard' button at the bottom.
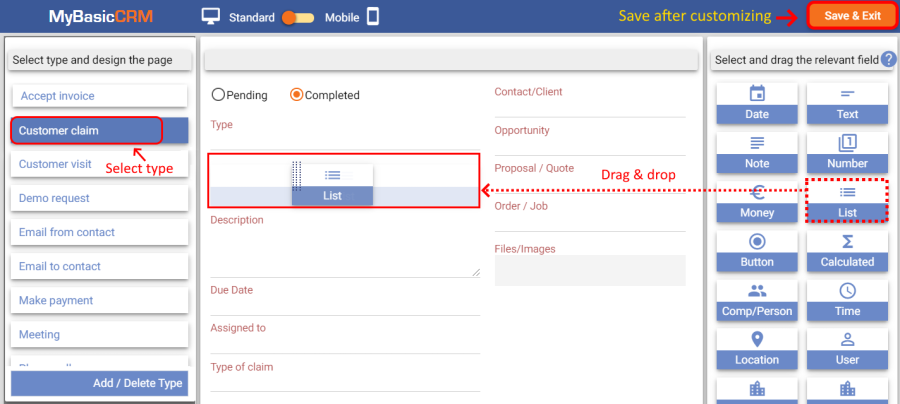
Select the type of task/activity to customize, i.e. 'Customer claim' for our case. Drag and drop a list type of custom field to your page.
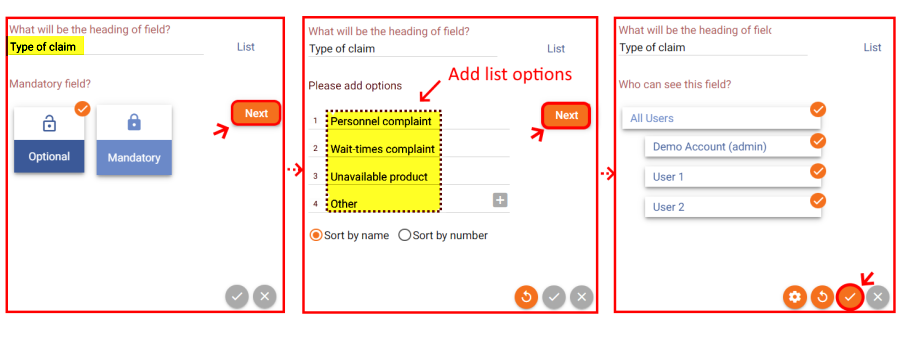
Name your new list, such as 'Type of claim'. On the next screen, you may enter new elements into your list. You will be able to select from these types of claims when creating a 'Customer claim' task. On the next screen, you can choose the users that the field will be visible, then save. Your new custom field should be ready after you click on 'Save & Exit' button on the top corner of the page.
Let's go to our Test user by searching the name, and then add a new task/activity by clicking on the round blue button
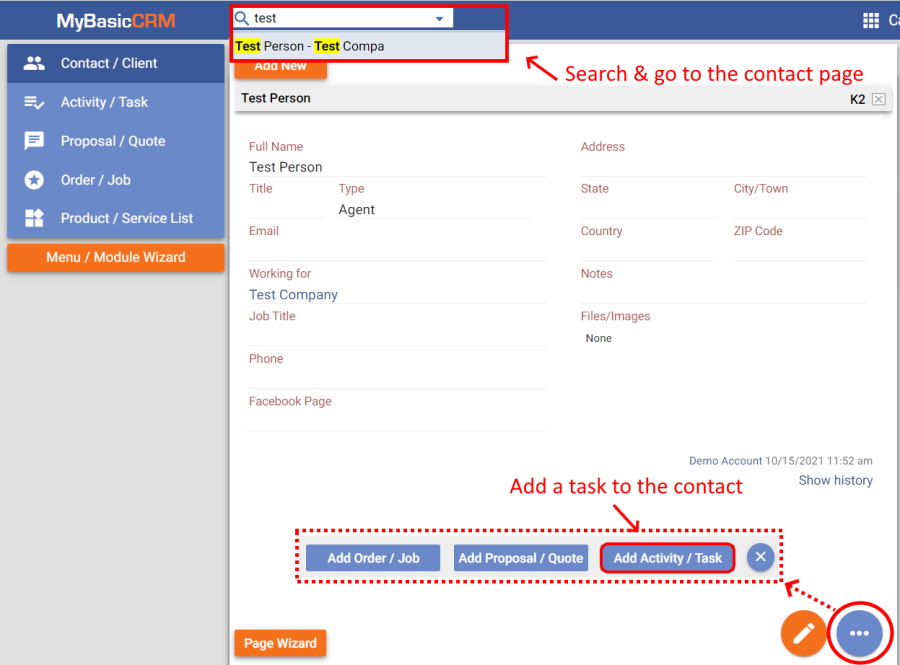
Select the type of activity as 'Customer claim,' and you can select a 'Type of claim' from the list of options you have just created. You can also assign the task to one of the account users.
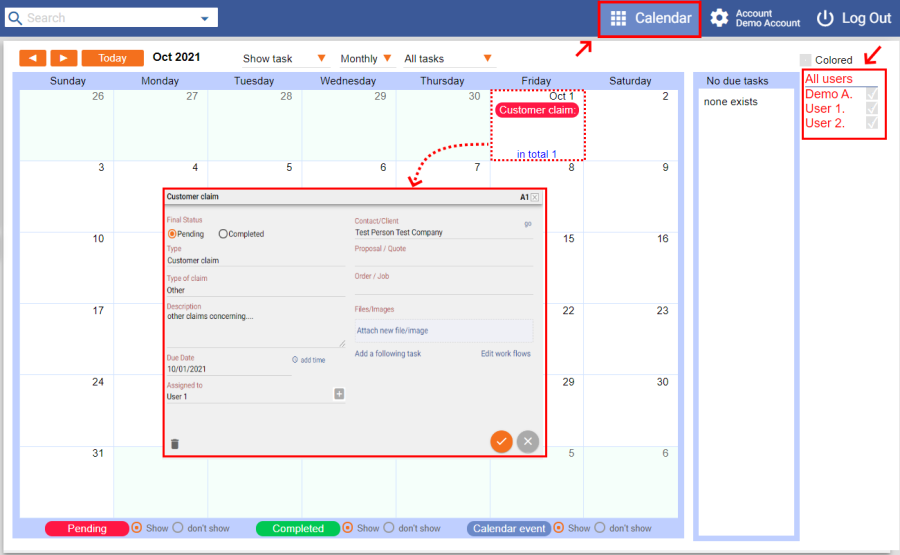
You will see this activity/task under your contact page.

You can also see and edit tasks on your calendar. You can access other user calendars if you are an admin user or have permission to do so. You can drag & drop the tasks to change task due dates. You can also edit tasks (such as adding notes) directly from the calendar screen by clicking on the task you want to edit.
You can create follow-up tasks and workflows with MyBasicCRM. Please refer to related tutorials.